Friday, 16 August 2019

Silicon Hack

If you wish to make bumpers for the scratchy bottoms of ceramics I've got a good hack.

Use the sticky type of silicon that is generally sold for bathroom grouting. The type that you can scarcely remove from your fingers if you happen to touch it. 

Here I am putting a long running pad of silicon on the bottom of a 'hand of Fatima' that I wish to use on my kitchen counter as a spoon rest. 


I've squeezed out a line of the sticky stuff on the back.

Now I will shape it with my finger using a small bowl of liquid soap. I used laundry soap but you can use dish soap or shampoo. You can cut it with a bit of water if you wish. You don't need much. 

Dipping my finger into the soap I shape the silicon to lay flat. It won't stick to your fingers.


Make dots of silicon to form round buttons instead of long lines of you wish. 

Let it harden and wash the soap off. Now you won't scratch the counter. Sometimes, after continual use especially in a wet environmental it will eventually listen off and you may have to pull it all off and repeat the process; but it will last a good long time. 


Monday, 8 July 2019

REALLY FAKE Kintsugi

Whimsical fun. Fake kintsugi for crazy broken pieces. Truly a gas! Perhaps I should make up a new name for this technique. People serious about restoration or conservation should really read no farther!


I try to talk hipsters out of getting the famous 'gold' repairs known as kintsugi, because I do not think that deviations from the traditional Japanese methods of doing these repairs are at all proper - and actually inappropriate. 

Cashew pastes, clay, lacquer and precious materials are used in time-honoured ways in the original method. Also only artifacts that were worthy of preservation or that would be enhanced by the emphasizing of the breaks were really addressed in this manner.

There are some good pages online - try searching on the word kintsugi and have a good read. Here's one - https://anagamablog.com/2011/02/28/kintsugi-%E9%87%91%E7%B6%99-restoration-for-pottery/


A lovely picture I saved years ago, so I do not have the photographer's name. I like the insertion of  completely different ceramic fragments.


A lovely example of texturing - also an unattributed picture, sorry.

Heritage chawan and wagashi bowls have risen to aesthetic heights with the application of kintsugi - but your Auntie's Crown Derby should probably be repaired in a different manner. Multiple breaks quite often don’t 'read' well. Here's a very messy looking B&W bowl with filled staple holes and really shattered material. Dog's breakfast. Yeah, this was me - when I didn’t know any better. 


I tried texturing a small chip in a 20thC Chinatown teabowl on a whim for a client, and I pronounced it 'not bad'. I made the fill of the chip higher than normal and pressed laundry netting into it. Ha! But I wouldn’t aspire to calling this kintsugi.


But here I am having some fun experimenting with a tremendously smashed up Kate Hyde/Thomas Aiken strawberry bowl. (gee, thanks Richard, for being so remiss while performing maid duties)

So, how was it done? 

After a routine reassembling of all the fragments and filling missing material with epoxy clay, I finally found a 'paint' at a crafting store that was supposed to form a hard bead of acrylic - to loosely imitate 'leading' of a stained glass, so to speak (doesn’t look at all like it, but you know what I mean). 

It came in a zillion colours including many metallics and indeed dried quickly into a satisfying bead. The only drawback was trying to apply it directly from a squeeze tube. This was especially difficult to do on larger chips. As you can see, I chose a very high, bright gold - which I thought appropriate with the whimsical Kate Hyde piece.

Edges could be taken down and formed a little with a brush while wet, and surfaces cleaned with an Exacto blade dry. 

Next project, I should repair in lime green or pink! Yay! So...not bad?


Tuesday, 29 January 2019

Update - An 18th Century Bee-Keeper


A had a visit recently from Peter Kaellgren, curator emeritus from the ROM (Royal Ontario Museum) who has confirmed my suspicions that this figure is Derby and not Chelsea. 

Wednesday, 28 November 2018

An 18th Century Bee-Keeper

I was given this little fellow years ago. The owner did not wish to restore it, as the damage was so great; but he thought I might want to work on it for myself. 

I have seen figures of this type marked as Chelsea, but there is no anchor mark. Actually, the twisted leaning aspect of the figure reminded me more of the slumping often seen in Derby figures.

It took a long time to find the time to get this fellow up on my workbench. He had no arms, hands, flowers and a lot of the bocage was missing. He had also been holding something vaguely conical in his left arm that was unidentifiable. 


I started by trying to work out what he had been holding. I figured a straw coiled beehive was in order. Then the arms could be started. I found a cast hand and a partial porcelain hand in my bin of parts, leftover from other projects. 


The hardest part was getting the gesture correct.


Now he is starting to come together. The first paint is applied while I decide whether flowers should be added to the bocage.


I will be posting the final result soon; but first I want to look at him for a few weeks to decide on the final effect.


LATER PROGRESS

Still refining the look of this guy. I think all I have to do now is address the bocage breakage on the left side. (Meaning, to the right of the picture.) perhaps a small chopped flower or a leaf. Sometimes you have to took at the picture to see it in a different way. ;)


And here is the final take on the bee-keeper! Not over-restored- kept some flowers chipped. I even MADE some chipped flowers! Isn’t he adorable?


Saturday, 11 March 2017

New Finial - Learning About Polymer Clay

I was recently asked to replicate a bone sphere that was used as a finial on a silver plated tea/coffee set. 


One sphere was available in a repaired state and required some fill where it had been glued together. It couldn't be taken apart without damaging the bone further. I felt that if filled, it could continue to be used and would be an example to copy.

I first turned my thoughts to wooden balls sold as knobs or door pulls to make a second sphere. They weren't very convincing, and I dreaded what they would look like surface-painted. 

My collection of Fimo polymer clay in a Ziploc bag was getting quite crumbly and difficult to work with; and I was beginning to wonder how I could proceed without investing in a lot of new materials.

Happily, there are many YouTube videos that show how to reconstitute the clay, as well as how to blend and do colour effects. Many of these videos give tours of workspaces and are full of tips, tricks and advice. I fell down the rabbit hole of the polymer clay crafting world.

The first thing I learned was that Fimo is not the polymer clay of choice amongst crafters. However, I seemed to have the right colours in my Ziploc. Buying both a liquid polymer clay and a block of 'softening' polymer clay transformed the Fimo I had into usable, blendable material.

After mixing some colours, I sliced a ball of my mix into many slices and dusted the inside surfaces with ground raw umber pigment, smacked it together again and tried to round it back into a sphere without disturbing the dark bands too much.

Some wire nails were cut shorter to press into the sides to imitate the silver inclusions on the original finial. Here they are matching pretty well. The new bottom one is not yet totally round.


Unfortunately, the baking darkened my new finial quite a bit. Also, it had to get a lot rounder.

Here it is going into the oven.


The baked sphere was easier to sand to roundness. A touch of white 'pickling' polyurethane mixture helped lighten it a bit, and a rub of polyurethane sealer gave it the same sheen as the bone original.

Here is the finished effect.


Here they are perched on top of their post supports with museum wax. A silversmith will have to straighten the posts and reinstall the finials after that is finished.


Monday, 31 October 2016

Monkey Musicians Continued

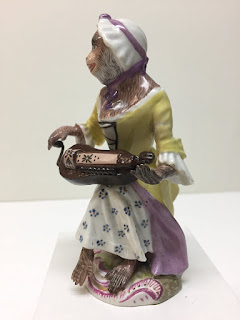
More pictures of our elegant hurdy gurdy player.


And now for my favourite monkey, the bagpipe player.

His yellow-painted bagpipe was cleaned to reveal a wonderful puce shade. First him in his 'repaired' state -


And now restored -


Both the original hands were missing and the bag-end, mouth-piece and pipes of his bagpipe.

His existing right arm stump was in a crazy twisted position which made for awkward piping. However, adding the forearm, cuff and hand still did not get that arm over to the pipe area.

I couldn't resist the look on his face and it seemed more logical to extend the hand to follow his gaze. The owner of the monkey consented to let me put a couple of gold coins in his hand. His look is totally appealing.


Heres an outtake of how the items are built.


Monkey Musicians of Qatar

Some Limbach (?) porcelain monkey musicians dropped by recently, a little the worse for wear.


At first glance you can see that the fellow with a curved element in his hand is actually missing a large round horn. Attachments of the missing horn appear at his lips, sleeve and cuff.

The Hurdy Gurdy Player appears to be playing a tiny lute-like instrument and is missing a foot.

The Bagpiper's instrument was painted with yellow oil paint and is missing most of the bag-end and pipes.

It's only when you start annotating pictures that the whole ugly truth comes out. In the next 3 pictures, I've indicated where major chips needed addressing. Yellow arrows and circled areas show all of the chips and areas replaced with badly sculpted plaster material, including arms, hands and instruments.


A really good cleanup was needed. Although I originally thought I would use some of the 'repairs' I didn't because repaired arms and hands did not make anatomical sense. 

The fragment of horn still in the fingerless hand of the horn player was a major problem also and after considering it for a long while, I decided to remove the original material there as well.


A metal split ring was the exact diameter of the body of this horn based on the original attachment areas at the break of the arm and the cuff. I looked at various pictures online of similar horn players.


Here is our visitor with his new horn, as well as all chips and missing fingers and toes. There was unfortunately no space for a flaring bell on the horn - but perhaps it is a hunting horn instead of a French horn.


The Hurdy Gurdy Player really was more of a problem. She appeared to have a small lute-like instrument. When I researched similar figures, I saw that hurdy gurdys were a much different shape. 
I took a picture of one while at Louisbourg Fort during the summer.


These instruments are played with both hands in the 'over' position, one on the crank and one over the top board to reach the keys. The position of the figure's left arm which still had original material to the elbow was entirely too long and had to be fudged to be an undershot hand. Perhaps she is just arriving  with her instrument.

Another thought is that she is actually a singer that had a book on her lap and no hurdy gurdy at all! She has the sitting position with one leg slightly raised that the singer figures quite often had. However, she was billed as a hurdy gurdy player, and so she was going to play it.

Research of similar figures have both standing and seated players.


I had puzzled for a long time whether her legs were actually crossed - but dismissed that because the left foot existed in the original and the big monkey toe was positioned correctly. I had no choice but to make the right foot which was missing as a proper right monkey foot. I could not match the size of the left as it appeared out of proportion raised that high. We finally decided in the studio that she would get a more pointed elegant foot since it was so prominent.

Here she is about to start playing her hurdy gurdy.